Monday, May 27, 2013

Pita Bread

I have been searching and trying out countless numbers of pita bread recipes and have failed at all of them. Failed as in they did not puff and make the pocket, which is what a pita bread needs. So the other day I decided to try again and what do you know it puffed. I think I only had one or two that didn't puff. I love being able to successfully make things from scratch and to know that I am feeding my family healthier things that don't have tons of preservatives and such. Now these take some time but believe me they are super easy to make. Don't let the raising process scare you off. We stuffed our pitas with falafel but you can fill it with any kind of meat or rice or whatever your heart fancies.
 
Pita Bread
1 1/4 c. warm water
2 tsp yeast
2 tsp salt
2 T. olive oil
3-31/4 cup flour
 
In the bowl combine yeast and the warm water and let sit for 10 minutes until foamy and dissolved. Add 1 1/2 cup of the flour. Cover and let rest for 1 1/2 hours; until doubled. Add the salt, oil and 1 1/2 cup flour. Knead the dough 10 minutes with the dough hook of your stand mixer or by hand. You may need to add the extra 1/4 flour or a little bit more even until you have a soft smooth dough. Then place in and oiled bowl , cover and let raise another 1 1/2 hours or until doubled. Preheat the oven to 475 degrees. Have an oven shelf on the lowest level of oven and place a baking stone or a large cookie sheet on it before preheating it. When the dough is done raising. Cut the dough into 8-12 pieces depending on how big you want each pita. On a lightly floured surface, shape each into a ball and then flatten into a disk. Cover with oiled plastic and allow it to rest for 20  minutes. Then roll each disk into a circle a little under 1/4 inch thick. Try to get them all even throughout. Allow them to rest for 10 minutes before baking. Spray each one  with water from a water bottle right before you bake them. Quickly place 1 piece of dough onto heated stone or cookie sheet in oven. Bake for 3-5 minutes. The pita should be completely puffed but not beginning to brown. The dough will not puff if not moist enough. don't forget to spray each one right before you bake.


Thursday, May 16, 2013

Crowd-size Cheesecake

Do you ever need to take a dessert somewhere to feed a crowd of people? Well, then this recipe is for you. It is extremely easy to make, affordable, and down right delicious. Believe me you will get rave reviews from everyone that eats it. I have been making this recipe  for a very long time and is one of our families favorite recipes. Our good family friend, Janis, brought this to a get together and we have been making it ever since. Thanks, Janis, for this wonderful recipe. If you need a large cool dessert for this summer, please, I beg you to make this. One other great thing about it is you can use your favorite choice of pie filling, make your own fruit topping, or use fresh fruit/berries that are in season at the time!!
 
Crowd-size  Cheesecake
1 box white, vanilla, or yellow cake mix(made according to package directions)
2 packages(8 oz each) cream cheese, softened
1 large tub cool whip
3 cup powdered sugar
2-3 cans favorite pie filling or 3-4 cups fresh berries or fruit of your choice
 
Mix the cake according to package directions. Pour batter into a large cookie sheet with sides. Bake at 350 for about 15-20 minutes or until a toothpick inserted in the middle comes out clean. Allow to cool completely. Meanwhile. In a large bowl beat the cream cheese until creamy add the powdered sugar and beat till fluffy. Mix in the cool whip until well combined. Spread over the cooled cake. Top with pie filling or fruit. Refrigerate for 2-3 hours or overnight. Serve. Store leftovers in the fridge. If there are any!!!


Tuesday, May 7, 2013

Chili Meatballs over Rice

So I don't know about you but here in our house we love meatballs. I was trying to find a new recipe to use with meatballs and came across this recipe on Pinterest. I adapted it quite a bit to suit our taste and boy was it tasty. It turned out so well and was gobbled up by all of my littles and hubby. If you love the meatball go run to your kitchen right now and make these. You will not be disappointed. Trust me!! Plus this meal come together fairly quickly making it all the more appealing to make if you ask me. Now if you are one of those who won't eat red meat. You can substitute turkey or chicken in beef's place but for me I will stick with beef I like it better and my motto is everything in moderation plus beef is loaded with iron which we all need. Just choose a lean ground beef!!
 
Chili Meatballs over Rice
2 lbs  ground beef
2 small onions or 1 large, minced small
1 1/2 tsp oregano
1/2 tsp cumin
1 tsp coriander
3 tsp salt(4 if you like it more salty I did 4 and thought it was the right amount)
1/2 tsp black pepper
1 tsp spicy brown mustard
1 T. chili powder
2 large eggs
1 cup bread crumbs
handful of chopped pepperoni
2/3 cup shredded cheddar cheese
 
Mix all the ingredients together. Roll into 1-2 inch balls and place them on an aluminum foil lined baking sheet and bake at 400 for 15-20 minutes or till no longer pink and crispy or browned real well on all sides. While meatballs are cooking start your chili Sauce:
1 large onion, chopped
2 bell peppers(I used red), chopped
1 poblano pepper, chopped
2 jalapenos, chopped
2 tomatoes, chopped
1 large can(28 oz) crushed tomatoes
4 T. molasses
2 T. brown sugar
4 T. apple cider vinegar
6 T. ketchup
2 T. minced garlic
5 T. Worcestershire sauce
1/2 tsp smoked paprika
2 T. chili powder
2 tsp garlic salt
1 can beef broth
1 T. dried parsley or 1/4 cup chopped fresh parsley
 
In a large pot sauté the onion, bell peppers, poblano, and jalapenos until beginning to get tender. Then add the fresh tomatoes and garlic and sauté for a few more minutes. Then add all of the rest of the ingredients and bring to a boil. Add in the cooked meatballs and simmer for 20-30 minutes. The longer it simmer the better the flavor will be. Serve over rice.
 
Note: it was not spicy at all. All 3 of my kids ate this with no problems but if you are worried than just remember to deseed the pepper and take the ribs out because that is where the heat is but I like to leave the seeds and ribs in.

Monday, April 29, 2013

Double Chocolate Peanut Butter Cookies

Last week I wanted to make a peanut butter cookie but I didn't want to really make your normal plain peanut butter cookie and I couldn't find one I liked on the internet to use so I decide to just throw some ingredients together and make my own and can I tell you these were awesome!! I was so happy that a concoction I made up all on my own turned out so well. If you love Peanut butter and chocolate you must give these babies a try they are awesome especially with a little bit of vanilla ice cream or a glass of cold milk!!
 
Double Chocolate Peanut Butter Cookies(makes about 7-8 dozen)
1 1/2 cups butter, softened
3 cups peanut butter
4 cups brown sugar
4 eggs
1 1/2 T. vanilla
1- 1 1/2 cup baking cocoa(depending on how chocolaty you want it)
3 cups blended oats
1 cup blended peanuts
2 1/2 cups flour
2 tsp baking soda
1 tsp baking powder
1 pkg. chocolate chips or chunks
1 pkg. Reese's Pieces.
 
In the bowl of your stand mixer cream the butter, peanut butter, and brown sugar together until light and fluffy. Add the eggs and vanilla and mix well. Add the baking cocoa, blended oats, blended peanuts, flour, soda, and powder and mix till well combined. Stir in the chocolate chip and Reese's Pieces. Roll into 1-2 inch balls and place them on a greased cookie sheet. Smash then down a little bit with your hand and then bake them at 325 for 10 minutes and no longer!!! They may look undercooked but they won't be. Take them out and let rest on pan for 1-2 minutes then transfer to a cooling rack.
 
Note: I blend my oats and peanuts in a food processor until they are finely chopped not as smooth as flour but close. Use quick or old fashioned oats, I prefer old fashioned but whatever you have on hand will work!!
Note: Makes a lot of cookies. I always make a lot of cookies and then roll the dough and freeze them in a Ziploc bag to pull out when we want to have a hot cookie or I will cook them let them cool and then freeze them so they don't all go stale before we can eat them all and then I have them on hand without all the work!!

Thursday, April 25, 2013

French Fried Onion Chicken

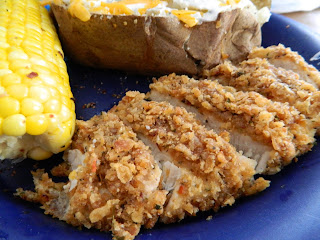
I had bought a huge bag of French fried onions(from Sam's Club because way cheaper than at Walmart) a few months back for a salad that I had made and had a ton that I still needed to use. So I looked on the back of the onion package and they had a recipe that had chicken breast coated in the crumbled up onions and baked. I thought it sounded good but decided to do my own twist on the recipe and bump up the flavor a bit because I thought it looked a little bland. Anyway, the outcome of the recipe was amazing!! So flavorful, juicy, and tender and went so well with a baked potato and fresh corn on the cob!!! this is super simple to make and comes together quickly you can even coat the chicken breasts earlier in the day and let them hang out in the fridge till you are ready to cook it.(that is what I did)
 
French Fried Onion Chicken
4 cups crushed French fried onions
4 T. flour(I used whole wheat but use whatever)
1/2 cup parmesan cheese garlic bread seasoning(recipe follows)
3 T. Ranch dressing mix or 1 packet
3 eggs
4 large chicken breasts cut in thin pieces or pounded out thin
 
Mix the crushed onions, flour, parm cheese garlic bread seasoning, and ranch dressing mix. in a shallow bowl or pan. Set aside. Crack the eggs in another shallow pan and beat with a fork. Take your chicken pieces and dip them in the beaten eggs, then in the onion mixture pressing the onion coating on each side of chicken till well coated. Place on a greased cookie sheet. Bake at 375 for 25-30 minutes or until golden brown and crispy on the outside. Take out and serve.
 
Parmesan Garlic Bread Seasoning
1/2 cup parmesan cheese
2 tsp kosher salt
2 T. garlic powder~not salt
2 tsp. oregano
2 tsp basil
2 tsp parsley
Mix all together and store in a spice jar or ziploc bag in the fridge. Use to sprinkle on breadsticks or french bread as well.
 
Note: I usually double or triple the garlic bread seasoning recipe and keep it on had for when we want garlic bread. I store mine in a old parmesan cheese container so I can just sprinkle on the bread. But store it in whatever you have.
 

Wednesday, April 17, 2013

Banana Bread

How many of you ever have bananas that go bad before you can eat them all? It seems that this happens quite frequently in our household especially in the summer when it is hot and humid. I have a really great cream cheese banana bread recipe on here but I wanted to have a just a regular go to banana bread recipe. So I went on the hunt for one and found this great recipe at Mel's Kitchen café. This really was wonderful and my new favorite recipe for banana bread. I am one of those that loves nuts in my banana bread but my hubby doesn't so I always make it without for him but if you love nuts go ahead and add them.
 
Banana Bread adapted from Mel's Kitchen Café
1/2 cup butter
1/2 cup sugar
3/4 cup brown sugar
1 to1 1/2  cup bananas(3-4 ripe bananas)
2 eggs
4 T. buttermilk
1 tsp. vanilla
2 tsp  Rum flavored extract
1 3/4 cup flour
1 tsp baking powder
1/4 tsp salt
1/8 tsp baking soda
 
Cream the butter and sugars together in a large bowl. Add the mashed bananas, eggs, buttermilk, vanilla, and rum extract ad mix until well combined. In a small bowl, mix the flour, baking powder, baking soda, and salt. Add to the wet ingredients and mix just until combined. Don't mix too much because over mixing makes a tough bread. Pour into 2 greased 8x4 inch loaf pans. Bake at 350 for 50 -55 minutes or until a toothpick comes out clean.
 
Note: you can use 1 cup mashed banana or 1 1/2 cup I like to use 1 1/2 cup for a stronger banana flavor but it works either way.
 
Note: if you have over ripe bananas and have no time to make banana bread. Don't throw those bananas away. Throw them in your freezer and store them there until you have time to make bread. Just let them thaw, mash them and use them. These make the best banana bread!!
 
Note: I tripled this recipe and it made 4 (9x5) loaf pans of bread. you can us smaller loaf pans or you can even make muffins with this batter as well

Wednesday, April 10, 2013

Crockpot Cheese Tortellini Soup

 I have one more soup recipe for you all before it gets way too hot to make soup.This soup is very similar to my other tortellini soup that I have on here but a little bit different. It is very tasty. It is one of my hubby's favorite next to the Toscana soup I posted a month or so ago. I have made this soup twice and I made it a little bit different the second time because I was short on time and didn't have any homemade spaghetti sauce on hand and it didn't turn out quite as good as the first time. I recommend that you use homemade marinara or spaghetti sauce in this recipe. You will thank me later. Just plan on making it when you have some leftover spaghetti sauce in the fridge that needs to be used. That is what I did the first time and it really  added to the flavor of the soup. Either way this soup is yummy and true comfort food!!!
 
 
Crockpot Cheese Tortellini Soup
1lb sausage or 1/2 ground beef 1/2 sausage
1 onion,chopped
7 carrots, chopped
4 stalks celery, chopped
2 T. minced garlic
1 bell pepper, chopped (any color)
3 cups marinara or spaghetti sauce
1 (32 oz) box plus 1 can beef broth
1 (28oz)can crushed tomatoes w/basil
1 tsp salt
1 tsp pepper
1 T. parsley
1 tsp basil
1 pkg. Good Seasons Italian dressing mix or roasted red pepper basil dip mix
8 oz cream cheese softened and cubed
2 cups chopped fresh spinach
19 oz cheese tortellini ,cooked
Brown the sausage/ beef till no longer pink. Add the onion, celery, carrots, bell pepper and garlic. cook 6-7 minutes or until veggies beginning to get tender. dump the sausage veggie mixture into a large crock pot and add all the ingredients except the spinach and tortellini. Cook on low for 6 hours or on high 3 hours. 20 minutes before you serve it add the tortellini and the spinach till heated through. Serve with warm rolls or breadsticks!!!

Thursday, March 28, 2013

Toasted Coconut Chocolate Chip Cookies

 
Where do I even begin with these cookies? They seriously are little bits of heaven and my ultimate favorite cookie that have ever crossed my lips. If you love coconut and even if you think you don't  you have to try these. Toasting coconut makes it crunchy and sweet and you won't even know you are eating coconut. Please drop what you are doing and go bake yourself a batch of these cookies. Your taste buds will thank me and your hips as well! Did I just say that? Ok your hips will hate me because it is hard to just eat one!!!! But go make some anyway because we all need a little sweets in our life every once in awhile!
Toasted Coconut Chocolate Chip Cookies
1 cup butter
3 cups brown sugar
4 tsp. vanilla
2 tsp. coconut extract
4 eggs
4-5 cups flour
2 tsp. baking powder
1 tsp. baking soda
1/2 tsp. salt
1 pkg. toffee bits
1 pkg. Chocolate chips
3 c. toasted coconut

In the bowl of your mixer, cream the butter and sugar together until creamy and fluffy. Add the extracts and eggs and mix well. Mix in the flour, powder, soda, and salt and mix till well combined. Stir in the toffee bits, chocolate chips, and the coconut. Roll into 1-2 inch balls and place on a greased cookie sheet. Bake at 325 degrees for 11-13 minutes, slightly underdone is better. Let cool on pan for 2-3 minutes and then transfer to cooling racks and Enjoy!!!!

Wednesday, March 13, 2013

Taco Enchiladas

We love love love enchiladas here in our house. Since my husband grew up in Mexico I usually only like authentic red and green enchiladas which I have already posted on this blog. But when I came across these enchiladas over at Mel's kitchen Cafe I knew that I had to give them a try. They were so yummy and the cornmeal crepes tasted very similar to a tamale. Mel said (look I act like I actually know her!! I don't but I feel like I do from her blog)they reminded her of corn tortillas but I thought these tasted similar to eating a tamale because the crepe was tender and soft but whatever they taste like a tamale or a corn tortilla, this recipe is a winner. Your kids will gobble them up(mine did). If you want a new twist on an old classic give these babies a try. The crepes are easy and fast to make I promise. My little two year old helped me make and flip every single one of them!!


Taco Enchiladas with Cornmeal Crepes

Makes about 16 crepes:
1 1/3 cup flour
2/3 cup cornmeal
4 large eggs
1/4 tsp salt
2 cups milk

Meat Mixture:
1 onion, chopped
1 jalapeno, chopped
2 lbs ground beef
2 T. garlic, minced
1 tsp. salt
1 tsp pepper
2 T. chili powder
1 T. cumin
2 tsp Corriander
2(8 oz each)cans tomato sauce
2 cups shredded cheddar cheese
1 (20 oz) can red or green enchilada sauce
1 (10 oz) can red or green enchilada sauce
Optional: sliced olives, sour cream, guacamole, salsa

For the Crepes: Combine all the crepe ingredients in a blender and blend until smooth. Spray a 10 inch skillet with cooking spray and heat over medium heat until the skillet is very hot. Give the crepe batter a quick stire . Measure 1/4 cup of batter and pour into hot skillet, tilting the pan to coat the bottom evenly. The skillet should be hot enough that you should hear a sizzle when the batter hits the pan but not so hot that it burns the crepes, Cook for 30 seconds to 1 minutes and then loosen the edges with a rubber spatula and flip. Cooking the other side for 30 seconds or so. Repeat with the remaining batter, giving the batter a quick stir in between each crepe. Stake the crepes on top of each other. The crepes can be made 2 days in advance. Cool the crepes completely before storing them in the fridge in a ziploc bag or plastic wrap.
For the taco meat: brown the ground beef in a skillet. Drain the grease when no longer pink. Add in the onion, garlic, and jalapeno and cook until veggies are tender. Add in all the spices and cook for a minutes then add the tomato sauce and simmer for 20 minutes. Preheat the oven to 375 degrees. LIghtly coat a 9x13 inch pan with cooking spray. Lay all the crepes flat and fill them with 1/4 to 1/3 cup of the taco meat, sprinkle with cheese, roll up and place in the pan seam side down. Repeat with all the crepes. Pour 1 large can green enchilada sauce and 1 regular can red enchilada sauce over the top and sprinkle with cheese.(or you can use one large red and 1 regular green sauce) Bake for 20-25 minutes or until hot and bubbly. Serve with optional toppings if desired and rice and beans!!!
Adapted from Mel's Kitchen Cafe

Wednesday, March 6, 2013

Black Bean and Sweet Potato Burritos

So a few weeks ago I saw this recipe over at Mel's Kitchen Cafe and decided I needed to try it out. I am not a huge sweet potato fan so I was a little nervous about how these would turn out but Mel assured us that even her non loving sweet potato husband was going back for seconds with this yummy combination. So I decided to get over my nervousness and just give these babies a try and boy were they yummy. They are more of a sweet and savory burrito than your traditional bean burrito but tasty non the less and oh so healthy for you!!! If you are sweet potato fan and even if you aren't give these babies a try and your kids will gobble them up too!! Well at least mine did!!and they like me do not like sweet potatoes that much. I mean look at all that colorful food!!! so so good and good for you. The more colors of the rainbow you eat the healthier you are and I mean as in veggies and fruit not candy/doughnuts!!!!!

Black Bean and Sweet Potato Burritos
4 sweet potatoes, peeled and cubed small
3 jalapenos, finely diced
2 red bell peppers, diced small
2 red onions, diced small
2 T. olive oil
2 tsp cumin
1 T. chili powder
1 tsp salt
1 tsp black pepper
2(15 oz each)cans black beans, drained and rinsed
1/2- 1 cup chopped cilantro, depending on your taste(we like the full cup)
juice of 2 limes
Cheese of your choice-we use sharp cheddar
tortillas(wheat or white we always have homemade tortillas)

Preheat the oven to 425 degrees. IN a large bowl, toss the sweet potatoes, jalapenos, red peppers, and red onions with the olive oil, cumin, chili powder, salt and pepper. Dump the coated veggies onto a large rimmed baking sheet and roast for 20-30 minutes, tossing halfway through. Veggies should be tender but not mushy at the end of the cooking time. Mine took closer to 30 minutes but just use your own judgement. Let the veggie mixture cool a little bit then scrape veggies back in the large bowl and toss with the black beans, lime juice and cilantro. Taste the mixture and add additional salt and pepper if needed. Place desired amount of veggie bean mixture onto a tortilla, sprinkle with cheese, roll up and lay seamside down on a baking sheet. Repeat with all the mixture and tortillas. Bake at 375 for about 10-15 minutes or until heated through and golden brown or if you like the tortilla soft wrap each in tin foil and heat through. Serve with salsa and avocados!! Yumm!!!!!