Monday, April 29, 2013

Double Chocolate Peanut Butter Cookies

Last week I wanted to make a peanut butter cookie but I didn't want to really make your normal plain peanut butter cookie and I couldn't find one I liked on the internet to use so I decide to just throw some ingredients together and make my own and can I tell you these were awesome!! I was so happy that a concoction I made up all on my own turned out so well. If you love Peanut butter and chocolate you must give these babies a try they are awesome especially with a little bit of vanilla ice cream or a glass of cold milk!!
 
Double Chocolate Peanut Butter Cookies(makes about 7-8 dozen)
1 1/2 cups butter, softened
3 cups peanut butter
4 cups brown sugar
4 eggs
1 1/2 T. vanilla
1- 1 1/2 cup baking cocoa(depending on how chocolaty you want it)
3 cups blended oats
1 cup blended peanuts
2 1/2 cups flour
2 tsp baking soda
1 tsp baking powder
1 pkg. chocolate chips or chunks
1 pkg. Reese's Pieces.
 
In the bowl of your stand mixer cream the butter, peanut butter, and brown sugar together until light and fluffy. Add the eggs and vanilla and mix well. Add the baking cocoa, blended oats, blended peanuts, flour, soda, and powder and mix till well combined. Stir in the chocolate chip and Reese's Pieces. Roll into 1-2 inch balls and place them on a greased cookie sheet. Smash then down a little bit with your hand and then bake them at 325 for 10 minutes and no longer!!! They may look undercooked but they won't be. Take them out and let rest on pan for 1-2 minutes then transfer to a cooling rack.
 
Note: I blend my oats and peanuts in a food processor until they are finely chopped not as smooth as flour but close. Use quick or old fashioned oats, I prefer old fashioned but whatever you have on hand will work!!
Note: Makes a lot of cookies. I always make a lot of cookies and then roll the dough and freeze them in a Ziploc bag to pull out when we want to have a hot cookie or I will cook them let them cool and then freeze them so they don't all go stale before we can eat them all and then I have them on hand without all the work!!

Thursday, April 25, 2013

French Fried Onion Chicken

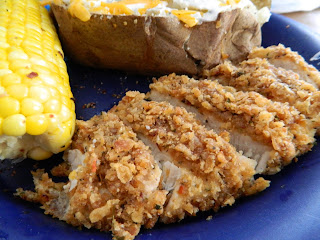
I had bought a huge bag of French fried onions(from Sam's Club because way cheaper than at Walmart) a few months back for a salad that I had made and had a ton that I still needed to use. So I looked on the back of the onion package and they had a recipe that had chicken breast coated in the crumbled up onions and baked. I thought it sounded good but decided to do my own twist on the recipe and bump up the flavor a bit because I thought it looked a little bland. Anyway, the outcome of the recipe was amazing!! So flavorful, juicy, and tender and went so well with a baked potato and fresh corn on the cob!!! this is super simple to make and comes together quickly you can even coat the chicken breasts earlier in the day and let them hang out in the fridge till you are ready to cook it.(that is what I did)
 
French Fried Onion Chicken
4 cups crushed French fried onions
4 T. flour(I used whole wheat but use whatever)
1/2 cup parmesan cheese garlic bread seasoning(recipe follows)
3 T. Ranch dressing mix or 1 packet
3 eggs
4 large chicken breasts cut in thin pieces or pounded out thin
 
Mix the crushed onions, flour, parm cheese garlic bread seasoning, and ranch dressing mix. in a shallow bowl or pan. Set aside. Crack the eggs in another shallow pan and beat with a fork. Take your chicken pieces and dip them in the beaten eggs, then in the onion mixture pressing the onion coating on each side of chicken till well coated. Place on a greased cookie sheet. Bake at 375 for 25-30 minutes or until golden brown and crispy on the outside. Take out and serve.
 
Parmesan Garlic Bread Seasoning
1/2 cup parmesan cheese
2 tsp kosher salt
2 T. garlic powder~not salt
2 tsp. oregano
2 tsp basil
2 tsp parsley
Mix all together and store in a spice jar or ziploc bag in the fridge. Use to sprinkle on breadsticks or french bread as well.
 
Note: I usually double or triple the garlic bread seasoning recipe and keep it on had for when we want garlic bread. I store mine in a old parmesan cheese container so I can just sprinkle on the bread. But store it in whatever you have.
 

Wednesday, April 17, 2013

Banana Bread

How many of you ever have bananas that go bad before you can eat them all? It seems that this happens quite frequently in our household especially in the summer when it is hot and humid. I have a really great cream cheese banana bread recipe on here but I wanted to have a just a regular go to banana bread recipe. So I went on the hunt for one and found this great recipe at Mel's Kitchen café. This really was wonderful and my new favorite recipe for banana bread. I am one of those that loves nuts in my banana bread but my hubby doesn't so I always make it without for him but if you love nuts go ahead and add them.
 
Banana Bread adapted from Mel's Kitchen Café
1/2 cup butter
1/2 cup sugar
3/4 cup brown sugar
1 to1 1/2  cup bananas(3-4 ripe bananas)
2 eggs
4 T. buttermilk
1 tsp. vanilla
2 tsp  Rum flavored extract
1 3/4 cup flour
1 tsp baking powder
1/4 tsp salt
1/8 tsp baking soda
 
Cream the butter and sugars together in a large bowl. Add the mashed bananas, eggs, buttermilk, vanilla, and rum extract ad mix until well combined. In a small bowl, mix the flour, baking powder, baking soda, and salt. Add to the wet ingredients and mix just until combined. Don't mix too much because over mixing makes a tough bread. Pour into 2 greased 8x4 inch loaf pans. Bake at 350 for 50 -55 minutes or until a toothpick comes out clean.
 
Note: you can use 1 cup mashed banana or 1 1/2 cup I like to use 1 1/2 cup for a stronger banana flavor but it works either way.
 
Note: if you have over ripe bananas and have no time to make banana bread. Don't throw those bananas away. Throw them in your freezer and store them there until you have time to make bread. Just let them thaw, mash them and use them. These make the best banana bread!!
 
Note: I tripled this recipe and it made 4 (9x5) loaf pans of bread. you can us smaller loaf pans or you can even make muffins with this batter as well

Wednesday, April 10, 2013

Crockpot Cheese Tortellini Soup

 I have one more soup recipe for you all before it gets way too hot to make soup.This soup is very similar to my other tortellini soup that I have on here but a little bit different. It is very tasty. It is one of my hubby's favorite next to the Toscana soup I posted a month or so ago. I have made this soup twice and I made it a little bit different the second time because I was short on time and didn't have any homemade spaghetti sauce on hand and it didn't turn out quite as good as the first time. I recommend that you use homemade marinara or spaghetti sauce in this recipe. You will thank me later. Just plan on making it when you have some leftover spaghetti sauce in the fridge that needs to be used. That is what I did the first time and it really  added to the flavor of the soup. Either way this soup is yummy and true comfort food!!!
 
 
Crockpot Cheese Tortellini Soup
1lb sausage or 1/2 ground beef 1/2 sausage
1 onion,chopped
7 carrots, chopped
4 stalks celery, chopped
2 T. minced garlic
1 bell pepper, chopped (any color)
3 cups marinara or spaghetti sauce
1 (32 oz) box plus 1 can beef broth
1 (28oz)can crushed tomatoes w/basil
1 tsp salt
1 tsp pepper
1 T. parsley
1 tsp basil
1 pkg. Good Seasons Italian dressing mix or roasted red pepper basil dip mix
8 oz cream cheese softened and cubed
2 cups chopped fresh spinach
19 oz cheese tortellini ,cooked
Brown the sausage/ beef till no longer pink. Add the onion, celery, carrots, bell pepper and garlic. cook 6-7 minutes or until veggies beginning to get tender. dump the sausage veggie mixture into a large crock pot and add all the ingredients except the spinach and tortellini. Cook on low for 6 hours or on high 3 hours. 20 minutes before you serve it add the tortellini and the spinach till heated through. Serve with warm rolls or breadsticks!!!